


Tạo Bot Nhắn Tin Tự Động Cho Crush

Giả sử các bạn đang đang crush một cô nàng khó tính mà sẽ giận bạn ngay lập tức nếu bạn quên chúc ngủ ngon cô ấy vào mỗi buổi tối cũng như nhắn tin chào buổi sáng cô ấy vào ngày mới. Bạn là một lập trình viên quá bận rộn với công việc bạn sẽ làm gì để cô ấy không giận bạn ???
Trong bài viết này mình sẽ giúp các bạn giải quyết vấn đề nan giải này :v
Cùng bắt đầu với giải pháp nhé 🙂
Đầu tiên chúng ta sẽ bắt đầu với một key word quan trọng Bạn là một lập trình viên. Ohhh, bạn là một lập trình viên thế thì cái gì chúng ta không làm được thì sẽ nhờ máy tính làm giúp vậy. Chúng ta sẽ viết một chương trình đơn giản để lên lịch giúp việc gửi tin nhắn một các tự động.
Là một lập trình viên nghèo, đi làm chỉ vì đam mê thôi nên tiền lương chả đang bao nhiêu do đó chúng ta không có tiền để thuê cloud chạy ứng dụng 24/24. Để có thể chạy mọi thứ một cách miễn phí thì chúng ta sẽ sử dụng heroku để deploy ứng dụng và gitaction để lập lịch giúp chúng ta.
Chốt lại chúng ta sẽ làm như sau:
+) Tạo webservice bằng spring boot để thực hiện gửi tin nhắn qua facebook
+) Deploy ứng dụng web lên heroku
+) Cấu hình gitaction để lập lịch gọi api webservice thực hiện nhắn tin
Các bước chi tiết
Bước 1: Tạo webservice sử dụng spring boot
Đầu tiên các bạn tạo một project web bằng spring boot sau đó thêm các dependencies sau vào file pom.xml
<dependency>
     <groupId>org.springframework.boot</groupId>
     <artifactId>spring-boot-starter-web</artifactId>
</dependency>

<dependency>
     <groupId>org.seleniumhq.selenium</groupId>
     <artifactId>selenium-java</artifactId>
</dependency>
<dependency>
     <groupId>org.seleniumhq.selenium</groupId>
     <artifactId>selenium-chrome-driver</artifactId>
</dependency>
<dependency>
     <groupId>io.github.bonigarcia</groupId>
     <artifactId>webdrivermanager</artifactId>
     <version>3.0.0</version>
</dependency>
Đây là các dependencies để chúng ta có thể sử dụng các thư viện của selenium
Tiếp tục tạo cấu trúc thư mục ứng dụng như sau:
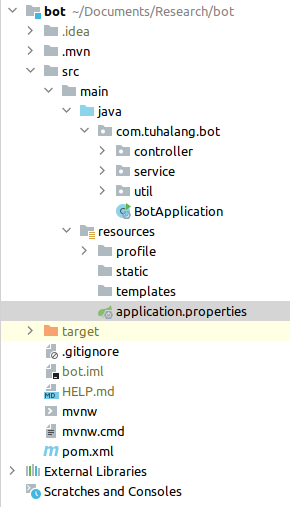
Tiếp theo trong package service chúng ta sẽ tạo class CommonService để thực hiện khởi tạo webdriver selenium
package com.tuhalang.bot.service;

import io.github.bonigarcia.wdm.WebDriverManager;
import org.openqa.selenium.WebDriver;
import org.openqa.selenium.chrome.ChromeDriver;
import org.openqa.selenium.chrome.ChromeOptions;

import java.io.File;

public class CommonService {

    protected WebDriver initDriver() {
        //version là version chrome trên máy của bạn
        WebDriverManager.chromedriver().version("86.0.4240.22").setup();
        File profile = new File("src/main/resources/profile");
        ChromeOptions options = new ChromeOptions();
        //options.addArguments("--headless");
        options.addArguments("--disable-extensions");
        options.addArguments("--disable-gpu");
        options.addArguments("--no-sandbox");
        options.addArguments("--disable-dev-shm-usage");
        options.addArguments("--user-data-dir="+profile.getAbsolutePath());
        WebDriver driver = new ChromeDriver(options);
        return driver;
    }

    protected void sleep(Long time){
        try {
            Thread.sleep(time);
        } catch (InterruptedException e) {
            e.printStackTrace();
        }
    }
}
Khi khởi tạo webdriver chúng ta cần chú ý chỉ định option –user-data-dir tức thư mục lưu trữ profile khi webdriver chạy để giúp chúng ta có thể lưu trạng thái khi đăng nhập facebook tránh việc phải đăng nhập nhiều lần dẫn đến bị checkpoint.
Tiếp theo chúng ta sẽ tạo class UserService để thực hiện xử lý việc đăng nhập, nhắn tin facebook
package com.tuhalang.bot.service;

import com.tuhalang.bot.util.Constants;
import com.tuhalang.bot.util.StringUtils;
import org.openqa.selenium.By;
import org.openqa.selenium.Keys;
import org.openqa.selenium.WebDriver;
import org.openqa.selenium.WebElement;
import org.springframework.stereotype.Service;

import java.util.List;

@Service
public class UserService extends CommonService{
    public void sendMessage(String msg, String userId){
        WebDriver webDriver = initDriver();
        login(webDriver);
        sleep(1000l);
        String url = Constants.URL_SEND_MESSAGE + userId;
        webDriver.get(url);
        sleep(1000l);
        webDriver.findElement(By.xpath("//*[@id=\"composerInput\"]")).sendKeys(msg);
        sleep(2000l);
        webDriver.findElement(By.xpath("//*[@id=\"composer_form\"]/table/tbody/tr/td[2]/input")).click();
        sleep(2000l);
        webDriver.close();
    }

    public void login(WebDriver webDriver){
        webDriver.get("https://www.facebook.com/");
        String title = webDriver.getTitle();
        if (title.matches("^(\\(.*\\) ){0,1}Facebook$")) {
            return;
        }
        webDriver.findElement(By.xpath("//*[@id=\"email\"]")).sendKeys(Constants.USERNAME);
        webDriver.findElement(By.xpath("//*[@id=\"pass\"]")).sendKeys(Constants.PASSWORD);
        webDriver.findElement(By.xpath("//*[@id=\"pass\"]")).sendKeys(Keys.ENTER);

        title = webDriver.getTitle();
        if (title.matches("^(\\(.*\\) ){0,1}Facebook$")) {
            System.out.println("Da login");
        }
    }
}
Ở đây Constants.URL_SEND_MESSAGE = “https://mbasic.facebook.com/messages/read/?fbid=”, giá trị userId truyền vào hàm sendMessage chính là id của conversion. Để lấy được id đó thì các bạn truy cập mbasic.facebook.com sau đó vào chat rồi chọn người các bạn muốn nhắn tin khi đó trên url sẽ có dạng như sau:
![]()
Các bạn chỉ cần lấy chuỗi số của param fbid.
Tiếp theo chúng ta sẽ viết controller để có thể expose api ra ngoài. Chúng ta sẽ tạo class MessageController trong package controller
package com.tuhalang.bot.controller;

import com.tuhalang.bot.service.UserService;
import org.springframework.beans.factory.annotation.Autowired;
import org.springframework.http.HttpStatus;
import org.springframework.http.ResponseEntity;
import org.springframework.web.bind.annotation.GetMapping;
import org.springframework.web.bind.annotation.RequestParam;
import org.springframework.web.bind.annotation.RestController;

@RestController
public class MessageController {

    @Autowired
    UserService userService;

    @GetMapping(value = "/api/send")
    public ResponseEntity sendMessage(@RequestParam("uid") String uid, @RequestParam("msg") String msg){
        userService.sendMessage(msg, uid);
        return ResponseEntity.ok(HttpStatus.OK);
    }
}
Mọi thứ đã gần như xong rồi, các bạn có thể chạy thử ứng dụng và sử dụng postman gọi API để thực hiện test ứng dụng của mình nhé.
Bước 2: Deploy ứng dụng web lên heroku
Sau khi tạo xong webservice chúng ta sẽ cần deploy nó lên cloud để có thể sử dụng ở mọi nơi. Ở đây mình chọn heroku đơn giản vì nó miễn phí.
Project webservice của chúng ta sau khi tạo xong sẽ cần đẩy lên github sau đó liên kết github với account heroku của các bạn.
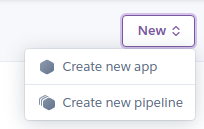
Sau khi đăng nhập heroku các bạn sẽ thực hiện create new app:
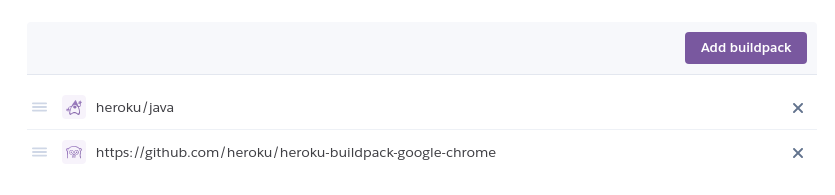
Sau khi tạo xong chúng ta sẽ chuyển qua tab setting và thực hiện add thêm 2 buildpack sau:
Tiếp đó chúng ta quay về tab deploy để thực hiện kết nối heroku với repository trên github và deployment
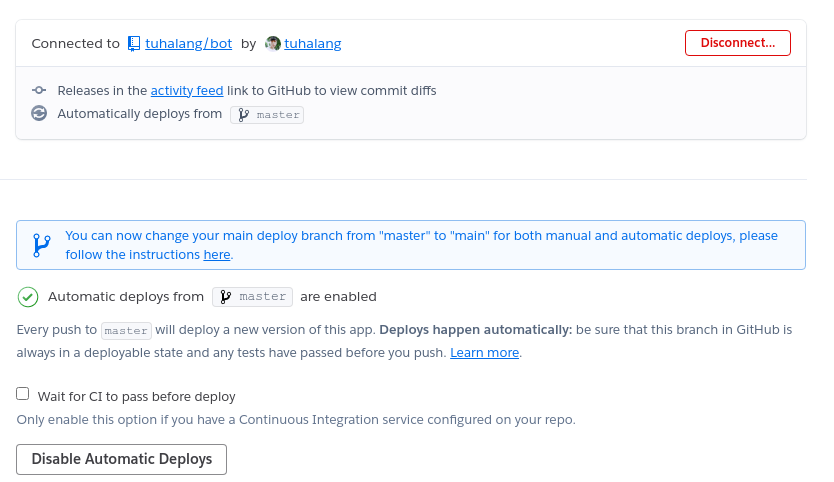
OK, bây giờ ứng dụng web của chúng ta đã được deploy thành công nhưng chưa thể cấu hình để lập lịch gửi tin nhắn được do heroku sẽ tự động chuyển sang chế độ ngủ đông nếu ứng dụng của chúng ta không hoạt động. Để giải quyết điều đó chúng ta sẽ sử dụng gitaction
Bước 3: Cấu hình gitaction để lập lịch
Để cấu hình gitaction các bạn có thể tạo một repository mới trên github hoặc sử dụng lại repository lúc nãy của chúng ta, ở đây mình sẽ tạo mới một repository.
Đoạn này mình sẽ viết một đoạn code bằng nodejs đơn giản để thực hiện call api gửi tin nhắn
const axios = require("axios");

const msgs = [

]

// ngày bắt đầu thực hiện gửi tin nhắn
const START_DATE = new Date("2020-12-28");
const _MS_PER_DAY = 1000 * 60 * 60 * 24;

function diffDate() {
    const now = new Date();
    const utc1 = Date.UTC(START_DATE.getFullYear(), START_DATE.getMonth(), START_DATE.getDate());
    const utc2 = Date.UTC(now.getFullYear(), now.getMonth(), now.getDate());
    return Math.floor((utc2 - utc1) / _MS_PER_DAY);
}

const sendMessage = async () => {
    const i = diffDate();
    let url = "https://XXXXX.herokuapp.com/api/send"
    const { data } = await axios.get(url, { params: { uid: YYYYYYY, msg: msgs[i]} });
};

sendMessage();
Trong đoạn code trên mình sử dụng mảng msgs để lưu trữ các tin nhắn mà các bạn muốn gửi từng ngày bắt đầu từ ngày đầu tiên. Từ ngày thứ 2 trở đi dựa trên sự sai khác với ngày ban đầu để có thể lấy ra được đoạn tin nhắn mà bạn muốn gửi.
Sau khi tạo xong bạn sẽ thực hiện chọn tab Actions trên repository github

Tiếp tục chọn New workflow và cấu hình file main.yml như sau:
# This is a basic workflow to help you get started with Actions

name: Send message

# Controls when the action will run.
on:
  workflow_dispatch:
  schedule:
  - cron: "0 23 * * *"

# A workflow run is made up of one or more jobs that can run sequentially or in parallel
jobs:
  # This workflow contains a single job called "build"
  build:
    # The type of runner that the job will run on
    runs-on: ubuntu-latest

    # Steps represent a sequence of tasks that will be executed as part of the job
    steps:
      # Checks-out your repository under $GITHUB_WORKSPACE, so your job can access it
      - uses: actions/checkout@v2
      - uses: actions/setup-node@v1
        with:
          node-version: 12.16.1
      - run: npm ci
      - name: Send message
        run: npm run send
Các bạn có thể thay đổi giá trị cron để thay đổi thời gian mà các bạn muốn gửi tin nhắn chú ý giờ ở đây sử dụng giờ UTC nên các bạn nhớ cộng thêm 7h để có thể nhắn theo giờ Vietnam được nhé.
Kết quả như thế nào?
Và cuối cùng đây sẽ là kết quả:
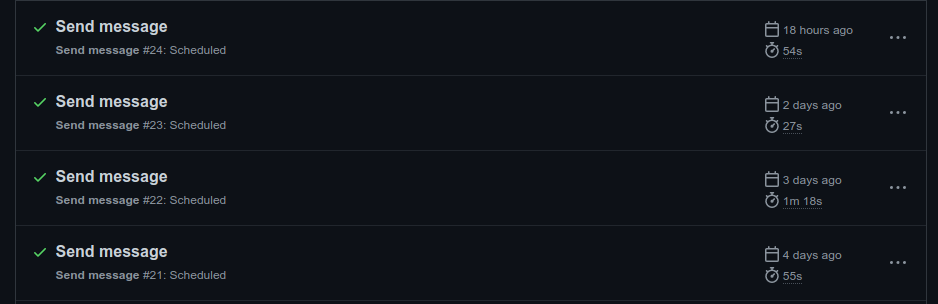
Chúc các bạn tán đổ crush thành công :))
Post Comment